Blog to Infographic: Repurposing Content
April 21, 2026Want to make your content more engaging? Turn blogs into infographics.
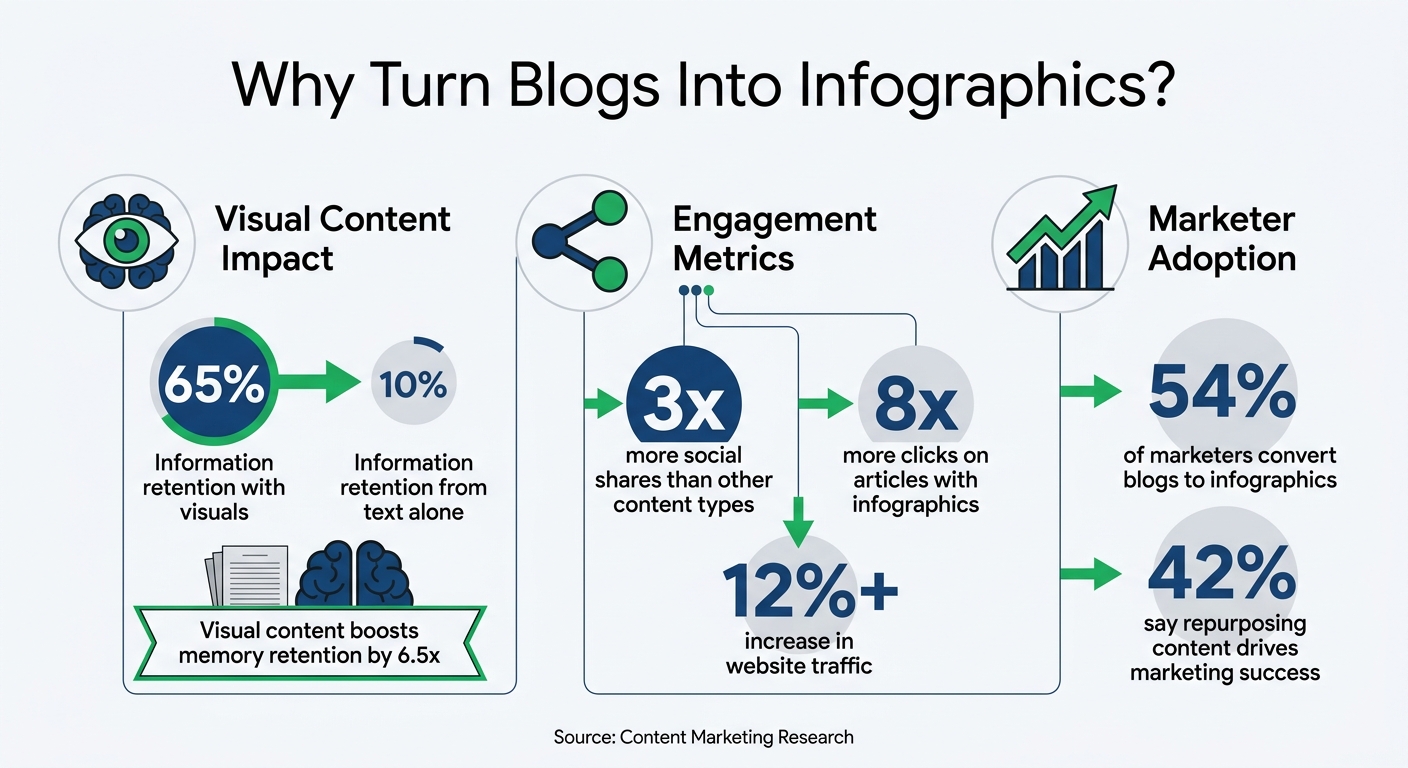
Infographics are easier to scan, share, and remember. They increase engagement and extend the life of your content without starting from scratch. Here's why this works:
- Retention: People remember 65% of what they see with visuals, compared to 10% from text alone.
- Social Sharing: Infographics are shared 3x more than other content types.
- Clicks: Articles with infographics get 8x more clicks than text-only posts.
Start by picking blog posts that are data-heavy or organized into clear sections. Extract the key points and simplify them into visuals like charts, icons, or diagrams. Use tools like Canva or Piktochart to design quickly, and share your infographic on platforms like Pinterest, LinkedIn, and Instagram for maximum reach.
Pro Tip: Focus on actionable insights and keep designs clean and mobile-friendly to attract more views and shares.
Blog to Infographic Conversion: Key Statistics and Benefits
How to Create an Infographic from a Blog Post | CANVA Tutorial
sbb-itb-cef5bf6
Finding Blog Posts That Work as Infographics
Not every blog post is ideal for turning into an infographic. The best candidates are those with content that naturally fits a visual format and delivers information clearly at a glance. Posts that tell a story visually or break down complex ideas into digestible chunks are perfect for this transformation.
Start by combing through your archive for blog posts with clear organization - think sections, bullet points, or numbered lists that can serve as a foundation for an infographic. Data-heavy articles, such as those packed with statistics, percentages, or comparisons, are especially well-suited. These can easily be turned into charts, graphs, or other visual elements. Similarly, how-to guides with step-by-step instructions can be reimagined as process flows or sequential diagrams.
"Shorter, more concise blogs are typically easier to convert into an infographic." - PaperStreet
What Makes a Blog Post Right for Conversion
When narrowing down your options, focus on blog posts that are actionable and packed with key takeaways. Posts that solve specific problems or answer direct questions often work well because their value is immediately apparent. Content that simplifies complex concepts through visuals - like icons, charts, or illustrations - also tends to resonate. For example, survey results, industry benchmarks, and comparative data can easily be visualized as bar charts or pie charts, making them more engaging and easier to understand.
Once you’ve identified the right blog post, the next step is to extract its most important elements.
Pulling Out the Main Points
After selecting the ideal post, the focus shifts to distilling its key information. Look for statistics and numerical data that will anchor your visuals. Pinpoint the core messages that provide the most value - these are often found in the introduction, conclusion, or subheadings. Rewrite these insights into concise, standalone statements.
Next, decide what can be shown visually instead of explained in text. Recurring ideas can be represented with icons, while comparisons can be laid out as side-by-side graphics. Step-by-step instructions can flow into diagrams. The ultimate goal is to streamline the content so it’s easy to grasp in 30 seconds or less.
Extracting Data and Organizing Infographic Content
After selecting the right blog post, the next step is to focus on extracting and organizing only the most relevant information. The idea here is to strip away unnecessary details and retain what truly matters. This process lays the groundwork for creating a visually appealing infographic that grabs attention and communicates effectively.
How to Extract Core Information
Go through your blog post and pull out 5–8 key points, such as insights, statistics, or actionable advice. Pay special attention to sections that already include bullet points, numbered lists, or data, as these are easier to translate into visuals. Including too much information can clutter the design, making it harder for your audience to follow.
When extracting, aim to simplify complex ideas. Break down dense paragraphs into shorter, stand-alone statements. For instance, a multi-step process can be turned into a flowchart, and comparative data works well as a bar or pie chart. Using visuals to represent ideas not only makes the content easier to understand but also more engaging.
Highlight important statistics or phrases using callout boxes. These elements naturally draw attention and ensure critical points stand out. Stick to concise text - short sentences and bullet points are far more effective than lengthy paragraphs, especially when space is limited and readers are scanning for key takeaways.
Once you’ve identified the main points, start planning how to present them visually by sketching out a basic storyboard.
Planning the Visual Layout
With your key information in hand, create a rough visual storyboard to outline the structure of your infographic. This step helps you decide where to place text and visuals and ensures the content flows logically from start to finish. Think of this as a blueprint that keeps everything cohesive and prevents the infographic from feeling like a random assortment of facts.
Use a clear visual hierarchy to guide the reader’s attention. Plan font sizes, weights, and colors to distinguish headings, subheadings, and body text. The most important information should be the most prominent, leading the reader through the content in the intended order. Organize the information in a way that feels natural - whether it’s a step-by-step process, a timeline, or a problem-solving narrative. The goal is to create a flow that’s intuitive and easy to follow, with a clear start and finish.
Designing Your Infographic with the Right Tools
Once you've mapped out your layout, it's time to bring your ideas to life with the right design tools. The platform you choose can make a huge difference in how smooth and efficient the process feels. Today’s tools come packed with features like templates, drag-and-drop interfaces, and brand kits, making the design process much easier.
Infographic Design Tools to Use
Your choice of tool will depend on your specific needs. Here are some popular options:
- Canva: Perfect for beginners, Canva offers an easy drag-and-drop interface and a vast library of templates. Its "Magic Switch" feature is a time-saver, allowing you to resize infographics instantly for different social media formats.
- Piktochart: This tool uses a block-based editing system, so you can tweak individual sections without affecting the overall layout. It's a good fit for those who prefer a guided approach to design.
- Venngage: Ideal for data-heavy projects, Venngage provides over 7,500 templates and advanced features like CSV uploads and an accessibility auditor to ensure designs meet WCAG 2.1 standards.
| Tool Name | Key Features | Ease of Use | Free Tier Availability |
|---|---|---|---|
| Canva | Drag-and-drop interface, templates, collaboration | Very Easy | Yes |
| Piktochart | Data visualization, custom templates, branding | Moderate | Yes |
| Venngage | Infographic themes, branding kits, export options | Easy | Yes |
If you’re looking for interactive elements like clickable buttons or hover effects, Visme is a great option, offering over 60 chart types and animated characters. For analysts who need to work with live datasets, Infogram allows you to link Google Sheets or CSV files directly to your visuals, ensuring your charts stay updated. Most of these tools have free plans, with paid options ranging from $12.25/month to $29/month, depending on the features you need.
Once you’ve chosen your tool, it’s time to focus on design principles to ensure your infographic is both clear and visually appealing.
Design Best Practices
When designing, keep your text brief and easy to scan. Replace long paragraphs with one-sentence explanations and use clear labels. Stick to two or three main colors in your palette to keep the design visually cohesive and avoid overwhelming the viewer. If you're working with a brand, set up a Brand Kit in your design tool to automatically apply your company’s logos, fonts, and colors to every project.
Use contrasting font sizes for headers, subheadings, and body text to create a clear visual hierarchy. This helps guide the reader’s eye through the content naturally. Ensure there’s enough negative space between sections and around grouped elements - studies show that increasing margins can improve comprehension by up to 20%.
Consistency matters, too. If you’re using filled-in icons, avoid mixing in line-art icons halfway through. And don’t forget to optimize for mobile screens, as many people will view your infographic on their smartphones. Test your design to ensure text remains legible and the layout works well on smaller screens. Tools like Smart Guides or Grid Views can help you maintain alignment, especially when working with multiple data points.
With your infographic designed, the next step is learning how to share it effectively and measure its impact.
Sharing and Promoting Your Infographic
Turning your blog post into an infographic is just the beginning. The real magic happens when you distribute it strategically.
Did you know that 54% of marketers transform their blog posts into infographics? That’s because a well-distributed infographic can significantly expand your reach.
Where to Share Your Infographic
Pinterest is a goldmine for visual content. To maximize visibility, use SEO-friendly titles and descriptions for your pins. Tools like Tailwind can help you schedule and distribute multiple graphics efficiently.
For a professional audience, LinkedIn is a great platform. Share your infographic as a carousel or as part of a text post with visuals. Carousels, in particular, encourage users to swipe through data points, boosting engagement naturally.
On Instagram and Facebook, consider breaking your infographic into smaller, digestible pieces. Highlight key data points through Reels or Stories. And don’t overlook email newsletters - audiences here tend to be highly engaged. Embedding your infographic or snippets into newsletters can drive clicks and conversions, often outperforming social media and search.
To reach even broader audiences, try content syndication. Republishing your infographic on platforms like Medium or LinkedIn Articles can lead to dramatic traffic increases - some publishers report growth as high as 1,215%. Guest blogging is another option. Create unique articles for third-party sites and include your infographic, tailoring the tone to fit the host site’s audience. You can also repurpose infographic data into short videos for TikTok, YouTube Shorts, or Instagram Reels.
When sharing, adapt your tactics to the platform. For instance, use multiple hashtags on Instagram but keep it minimal on LinkedIn. Updating older, high-performing blog posts with links to your new infographic can boost SEO and drive fresh traffic. And don’t forget to use proper alt text when publishing your infographic online to improve its ranking in Google Images.
After sharing, it’s essential to track how your infographic performs so you can fine-tune your strategy.
Measuring Performance and Results
Tracking the right metrics helps you understand your infographic’s impact. Start by checking the search engine rankings of the page hosting your infographic to gauge its SEO performance. On social media, monitor engagement metrics like likes and shares - especially on platforms like Facebook, Twitter, and Pinterest. Backlinks are another important indicator; the more websites and blogs that link to your infographic, the wider your reach.
Website traffic is another key metric. Keep an eye on how many visitors your infographic attracts and how many clicks it generates. But don’t stop at surface-level numbers - dig deeper to measure the business impact. Track leads, phone calls, and revenue that can be tied back to your infographic.
For better search visibility, include “[Infographic]” in your page titles and header tags. This can improve click-through rates. To make it easy for others to share your content, provide an embed code directly below your infographic. And when sharing on visual platforms, use keyword-rich descriptions and tags to ensure users can find your content.
If you’re working with a digital marketing partner like SEO Werkz, their monthly reports can help you systematically track these metrics and adjust your strategy based on data.
Conclusion
Turning blog content into infographics is a smart move for businesses looking to get more out of their existing content. It allows you to reuse what you’ve already created while appealing to audiences who prefer visuals over lengthy text. Instead of starting from scratch, you can transform your best-performing posts into eye-catching infographics, giving them a fresh, extended life.
The stats back this up: 42% of marketers and business owners say that repurposing content contributes to their content marketing success. Plus, well-crafted infographics can boost website traffic by 12% or more. That’s a solid payoff for leveraging work you’ve already invested in.
"Repurposing content isn't just a way to increase your production with fewer resources. It's also a way to reach new people and drive success across multiple channels." - Stefana Zarić, Author
To get started, focus on your top-performing blog posts. Pull out the most valuable insights, create engaging visuals, and share them widely. Whether it’s ranking in Google Images, earning backlinks, or sparking activity on platforms like Pinterest or LinkedIn, each infographic adds value to your overall strategy.
Take one of your best posts this week and turn it into an infographic. Experiment with different platforms, measure the results, and tweak your approach. Over time, this method will expand your reach, strengthen your brand, and make the most of your content.
FAQs
How do I choose the best blog post to turn into an infographic?
To pick the right blog post for an infographic, focus on one that offers clear and useful information that's simple to represent visually. Ideal candidates include posts with well-organized sections, bullet points, statistics, or practical tips. Shorter, more concise blogs typically work better, as they allow you to emphasize the main ideas while keeping the infographic visually engaging and easy to share.
What data should I include (and leave out) in an infographic?
When creating an infographic, focus on data that tells a clear story. Use statistics, trends, or comparisons that grab attention and support your main message. For example:
- Highlight key percentages or numbers that stand out, like "80% of consumers prefer X over Y."
- Use trends over time to show growth or change, such as "Online sales increased by 35% in the last year."
- Compare categories side-by-side with simple visuals, like bar or pie charts, to make contrasts obvious.
Avoid cluttering the design with excessive details or overly complex data. Stick to information that viewers can grasp at a glance. A clean, minimal approach ensures your infographic remains engaging and impactful.
How can I track whether my infographic is working?
To figure out whether your infographic is hitting the mark, start by keeping an eye on key metrics like page views, unique visitors, and time spent on the page. These numbers give you a sense of how far your content is reaching and how much it’s resonating with viewers.
Next, check out social interactions - shares, likes, and comments are great indicators of how engaged your audience is. The more people interact with your infographic, the more likely it is to spark interest and conversation.
For deeper insights, tools like Google Analytics can help you track its performance across different platforms, giving you a clearer picture of what’s working and where you might need to tweak things.